Chapter 16: Vibrations and Waves - Lesson 5: Standing Waves
Harmonics and Patterns
Hold down the T key for 3 seconds to activate the audio accessibility mode, at which point you can click the K key to pause and resume audio. Useful for the Check Your Understanding and See Answers.
 As mentioned earlier in Lesson 4, standing wave patterns are wave patterns produced in a medium when two waves of identical frequencies interfere in such a manner to produce points along the medium that always appear to be standing still. These points that have the appearance of standing still are referred to as nodes. Standing waves are often demonstrated in a Physics class using a snakey that is vibrated by the teacher at one end and held fixed at the other end by a student. The waves reflect off the fixed end and interfere with the waves introduced by the teacher to produce this regular and repeating pattern known as a standing wave pattern. A variety of actual wave patterns could be produced, with each pattern characterized by a distinctly different number of nodes. Such standing wave patterns can only be produced within the medium when it is vibrated at certain frequencies. There are several frequencies with which the snakey can be vibrated to produce the patterns. Each frequency is associated with a different standing wave pattern. These frequencies and their associated wave patterns are referred to as harmonics.
As discussed earlier in Lesson 4, the production of standing wave patterns demand that the introduction of crests and troughs into the medium be precisely timed. If the timing is not precise, then a regular and repeating wave pattern will not be discerned within the medium - a harmonic does not exist at such a frequency. With precise timing, reflected vibrations from the opposite end of the medium will interfere with vibrations introduced into the medium in such a manner that there are points that always appear to be standing still. These points of no displacement are referred to as nodes. Positioned in between every node is a point that undergoes maximum displacement from a positive position to a negative position. These points of maximum displacement are referred to as antinodes.
Examples of Standing Wave Patterns
The simplest standing wave pattern that could be produced within a snakey is one that has points of no displacement (nodes) at the two ends of the snakey and one point of maximum displacement (antinode) in the middle. The animation below depicts the vibrational pattern observed when the medium is seen vibrating in this manner.
The above standing wave pattern is known as the first harmonic. It is the simplest wave pattern produced within the snakey and is obtained when the teacher introduced vibrations into the end of the medium at low frequencies.
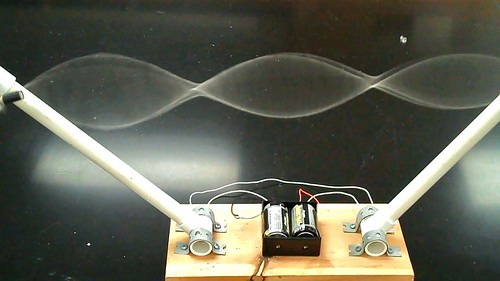
Other wave patterns can be observed within the snakey when it is vibrated at greater frequencies. For instance, if the teacher vibrates the end with twice the frequency as that associated with the first harmonic, then a second standing wave pattern can be achieved. This standing wave pattern is characterized by nodes on the two ends of the snakey and an additional node in the exact center of the snakey. As in all standing wave patterns, every node is separated by an antinode. This pattern with three nodes and two antinodes is referred to as the second harmonic and is depicted in the animation shown below.

If the frequency at which the teacher vibrates the snakey is increased even more, then the third harmonic wave pattern can be produced within the snakey. The standing wave pattern for the third harmonic has an additional node and antinode between the ends of the snakey. The pattern is depicted in the animation shown below.
Numerical Patterns Associated with Standing Wave Diagrams
Observe that each consecutive harmonic is characterized by having one additional node and antinode compared to the previous one. The table below summarizes the features of the standing wave patterns for the first several harmonics.
Harmonic | # of Nodes | # of Antinodes | Pattern |
|---|---|---|---|
Harmonic 1st | # of Nodes 2 | # of Antinodes 1 | Pattern |
Harmonic 2nd | # of Nodes 3 | # of Antinodes 2 | Pattern |
Harmonic 3rd | # of Nodes 4 | # of Antinodes 3 | Pattern |
Harmonic 4th | # of Nodes 5 | # of Antinodes 4 | Pattern |
Harmonic 5th | # of Nodes 6 | # of Antinodes 5 | Pattern |
Harmonic 6th | # of Nodes 7 | # of Antinodes 6 | Pattern |
Harmonic nth | # of Nodes n + 1 | # of Antinodes n | Pattern -- |
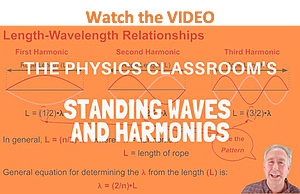
As one studies harmonics and their standing wave patterns, it becomes evident that there is a predictability about them. Not surprisingly, this predictability expresses itself in a series of mathematical relationships that relate the wavelength of the wave pattern to the length of the medium. Additionally, the frequency of each harmonic is mathematically related to the frequency of the first harmonic. The next part of Lesson 4 will explore these mathematical relationships.
Flickr Physics Photo
We Would Like to Suggest ...
 Why just read about it and when you could be interacting with it? Interact - that's exactly what you do when you use one of The Physics Classroom's Interactives. We would like to suggest that you combine the reading of this page with the use of our Standing Wave Patterns Interactive. You can find it in the Physics Interactives section of our website. The Standing Wave Patterns Interactive provides the learner an environment for exploring the formation of standing waves, standing wave patterns, and mathematical relationships for standing wave patterns.